Explore our Figma file for a detailed look into the hero and navbar structures.
Crucial: Our customer support team cannot provide direct assistance with the plugin. Any queries or suggestions should be directed to the Webflow Labs Community where the entire Webflow community (inclusive of staff) can offer additional aid and resources.
Would you rather create initial site blueprints in Figma and then utilize them as a roadmap for your Webflow site construction? Now you have the ability to seamlessly paste your Figma designs into Webflow without the need to painstakingly recreate each element. Additionally, you can utilize the Figma to Webflow App to synchronize your Figma components and variables with your Webflow site, allowing you to update them instantly with a simple click.
Note: The Figma to Webflow plugin was developed and launched by Webflow Labs, an internal creative team. Products introduced by Webflow Labs have limited support via our standard channels and are designed to be experimental, meaning their functionality may evolve. The plugin may also be removed at any time — use it at your own discretion. We eagerly await your thoughts, comments, and feedback here.
In this tutorial, you will gain insights on:
- Understanding the Figma to Webflow plugin
- The process of installing and authorizing the Figma to Webflow plugin
- How to utilize the Figma to Webflow plugin
- Understanding the plugin’s functionality
- Uninstalling the Figma to Webflow plugin
- Troubleshooting guide for the plugin
- Sharing feedback on the plugin
What does the Figma to Webflow plugin do?
This plugin translates Figma layers into their corresponding HTML and CSS code, which is the code generated by Webflow when you visually design your site.
The current translations supported by the plugin include:
- Auto layout
- Typography styles
- Border styles
- Shadow styles
- Background images and linear gradients
- Conversion of vectors and shapes to SVGs
- Images
- Opacity
- Absolute positioning
Note: Some translations are not supported due to Figma not being a dedicated web production tool.
Note: The Figma to Webflow plugin is currently incompatible with Figma on the Safari browser. We recommend utilizing Chrome or the Figma Desktop App.
How to install and authorize the Figma to Webflow plugin
To make use of the Figma to Webflow plugin, you must first register for a Figma account. Once done, follow these steps for plugin installation:
- Visit the Figma to Webflow plugin page
- Click on Open in… to access a new Figma design file and open a plugin modal window
- Select Run within the plugin modal window
- Click Connect account
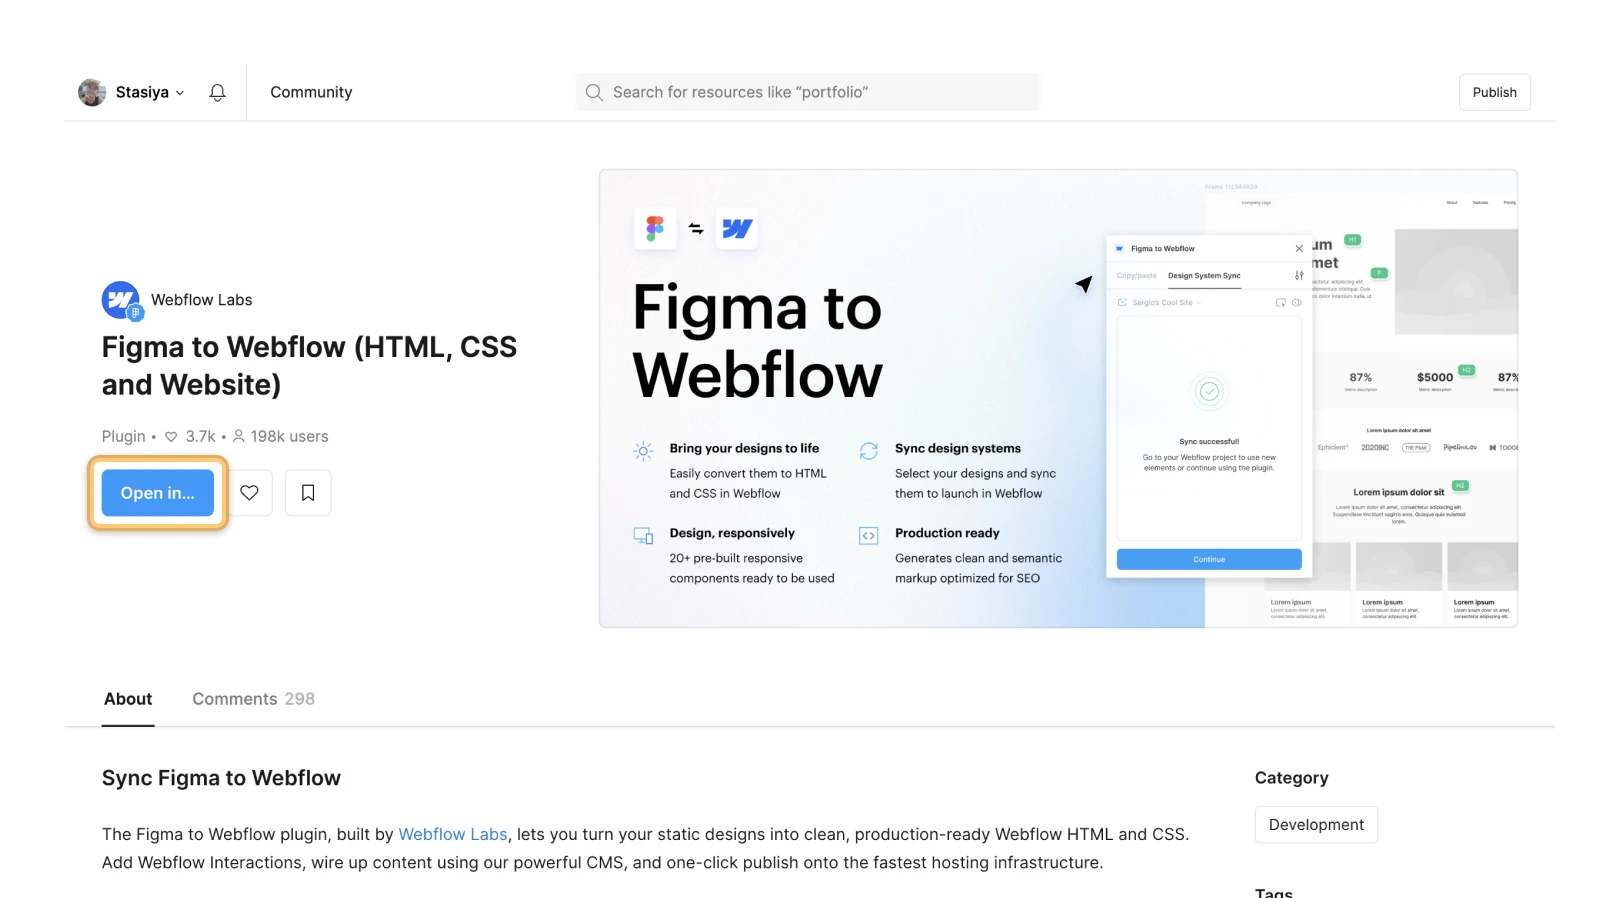
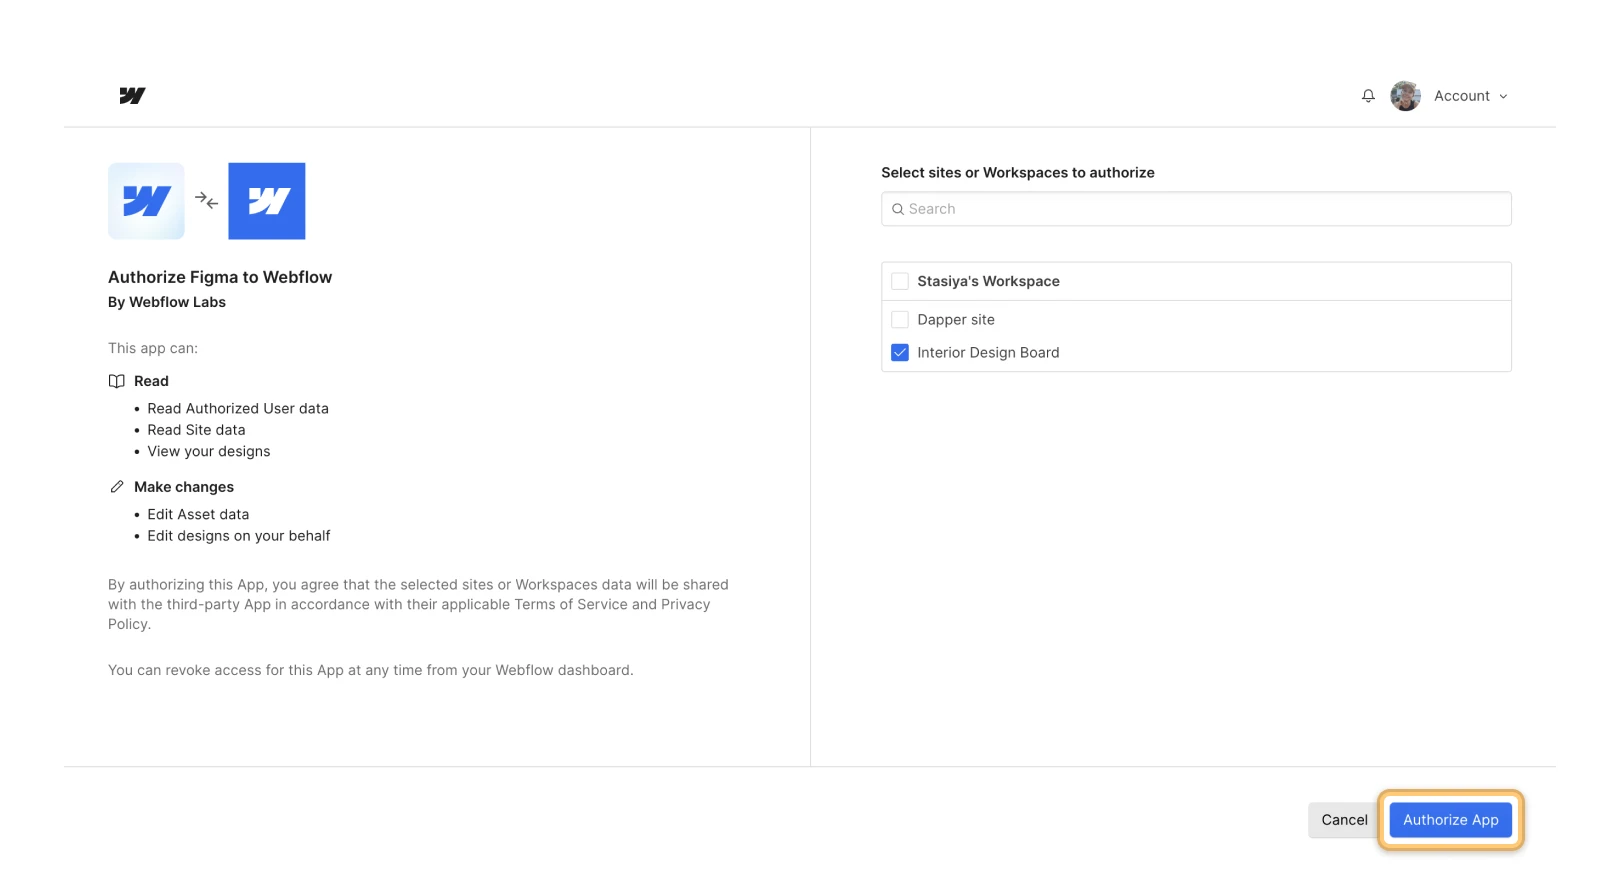
If you are not yet logged into Webflow, a new browser tab will open prompting you to log in using your Webflow credentials. You will then be directed to the App authorization page to authorize the plugin with your Webflow account and access its functionalites.
Select all the sites and Workspaces you wish to authorize the plugin for (i.e., all the sites where you intend to paste your Figma designs). Finally, click on Authorize app on the App authorization page.
Crucial: Ensure that you select the correct sites to ensure the accurate transfer of designs from Figma to Webflow. In case you forget to authorize the plugin for a particular site, follow the instructions to authorize it for a new site.
Remember, if you authorize the plugin for a specific site, you will only be able to remove the plugin from that particular site’s settings. On the other hand, authorizing the plugin for a Workspace will remove it from your Workspace settings. Further details on removing the plugin can be found.
Note: By authorizing this application, you agree to the Webflow Labs Terms of Service and Privacy Policy.
Adding or Removing Sites from Plugin Authorization
To add plugin authorization to a new site or revoke it from an existing one, follow these steps:
- Access the “hamburger menu” in the plugin modal window
- Select Log out
- Proceed through the plugin modal’s instructions
- Click Connect account
- Choose the sites for which you want to add or remove plugin authorization
Note: Logging out of the plugin will deauthorize it from all sites and Workspaces previously authorized on it. Re-authorize the plugin for your sites or Workspaces to resume using it.
Utilizing the Figma to Webflow Plugin
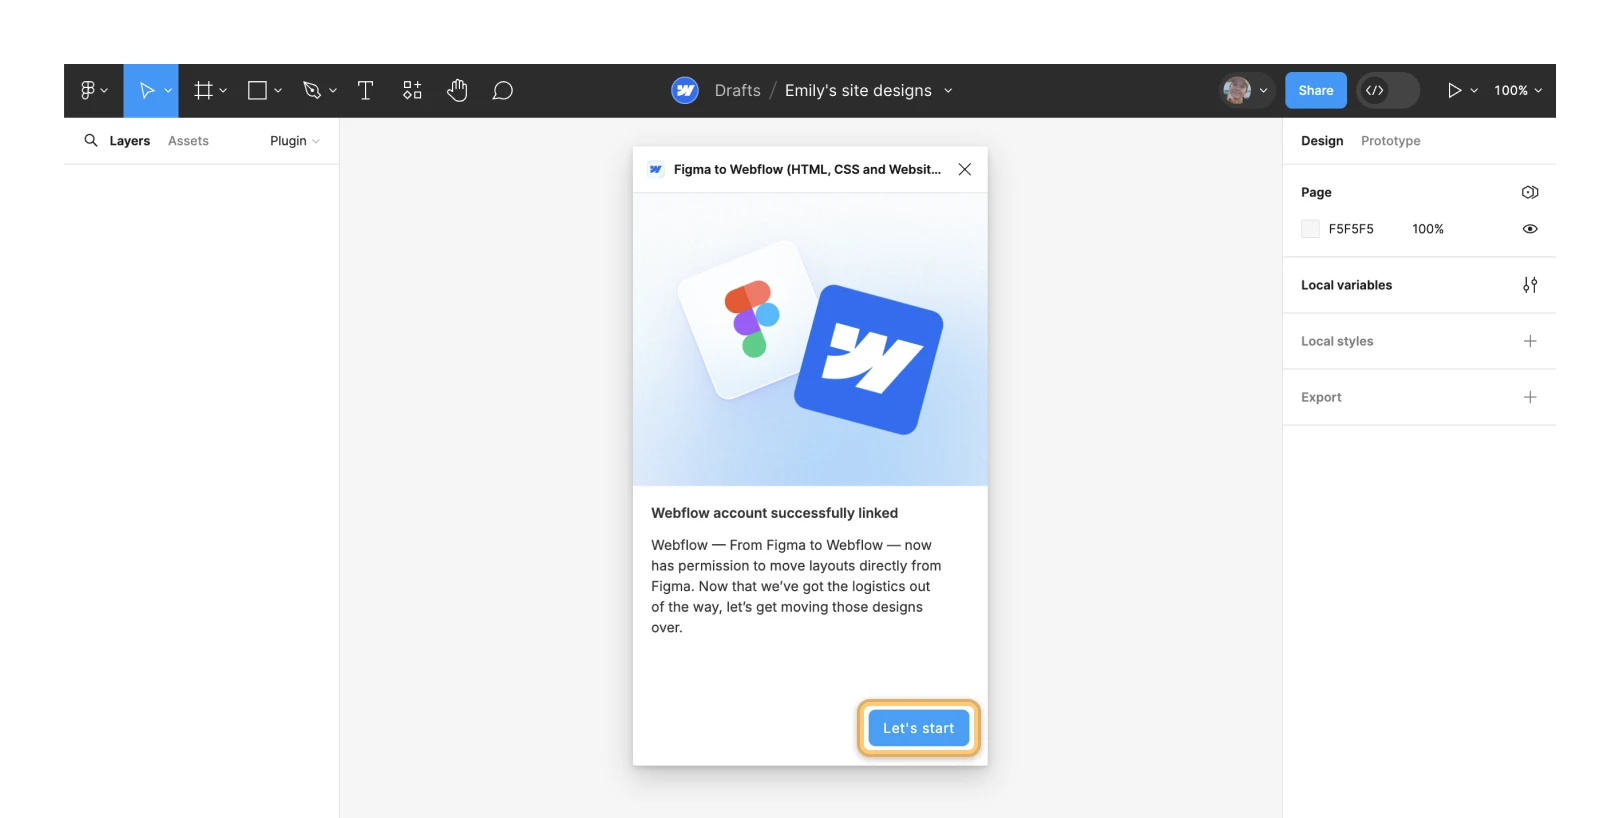
To begin using the plugin, return to Figma and click on Let’s start in the modal window. From there, you can:
- Initiate designs from scratch in Figma
- Employ Figma to Webflow plugin layouts
- Utilize Figma to Webflow plugin structures
- Transfer text and color styles using copy-paste
Designing from Scratch in Figma
In Figma, you can craft designs from the ground up (i.e., without utilizing the plugin’s prebuilt layouts or structures) — ensure you leverage auto layout. For responsive designs, set wrap and min/max width on parent frames. More insights on creating responsive Figma designs can be found here.
Ensure all frames, including nested ones, utilize auto layout. Additionally, if necessary,separate component instances to ensure you can modify the design in Webflow. You can swiftly separate instances by pressing Option + Command + B (on Mac) or Control + B (on Windows).
Tip for experts: You can utilize Option + Command + C (on Mac) or Control + Alt + C (on Windows) to duplicate a layer’s properties, then apply Option + Command + V (on Mac) or Control + Alt + V (on Windows) to transfer it to another selected layer. This shortcut is useful for duplicating fill, stroke, and text properties.
Once you design using auto layout, you can transfer it to Webflow using the plugin:
- Choose the design (including all its layers) on the Figma canvas
- Select the Webflow site you’d like to insert your design into from the Choose Webflow site dropdown in the plugin modal window
- Click Copy to Webflow in the Figma to Webflow plugin modal window
- Confirm copying to Webflow if prompted by the plugin
- Launch the Webflow Designer in a separate window
- Paste the design onto the Webflow Designer canvas
Reminder: You only need to select your Webflow site once from the Choose Webflow site dropdown. After that, you can duplicate and paste various designs from your Figma file to Webflow.
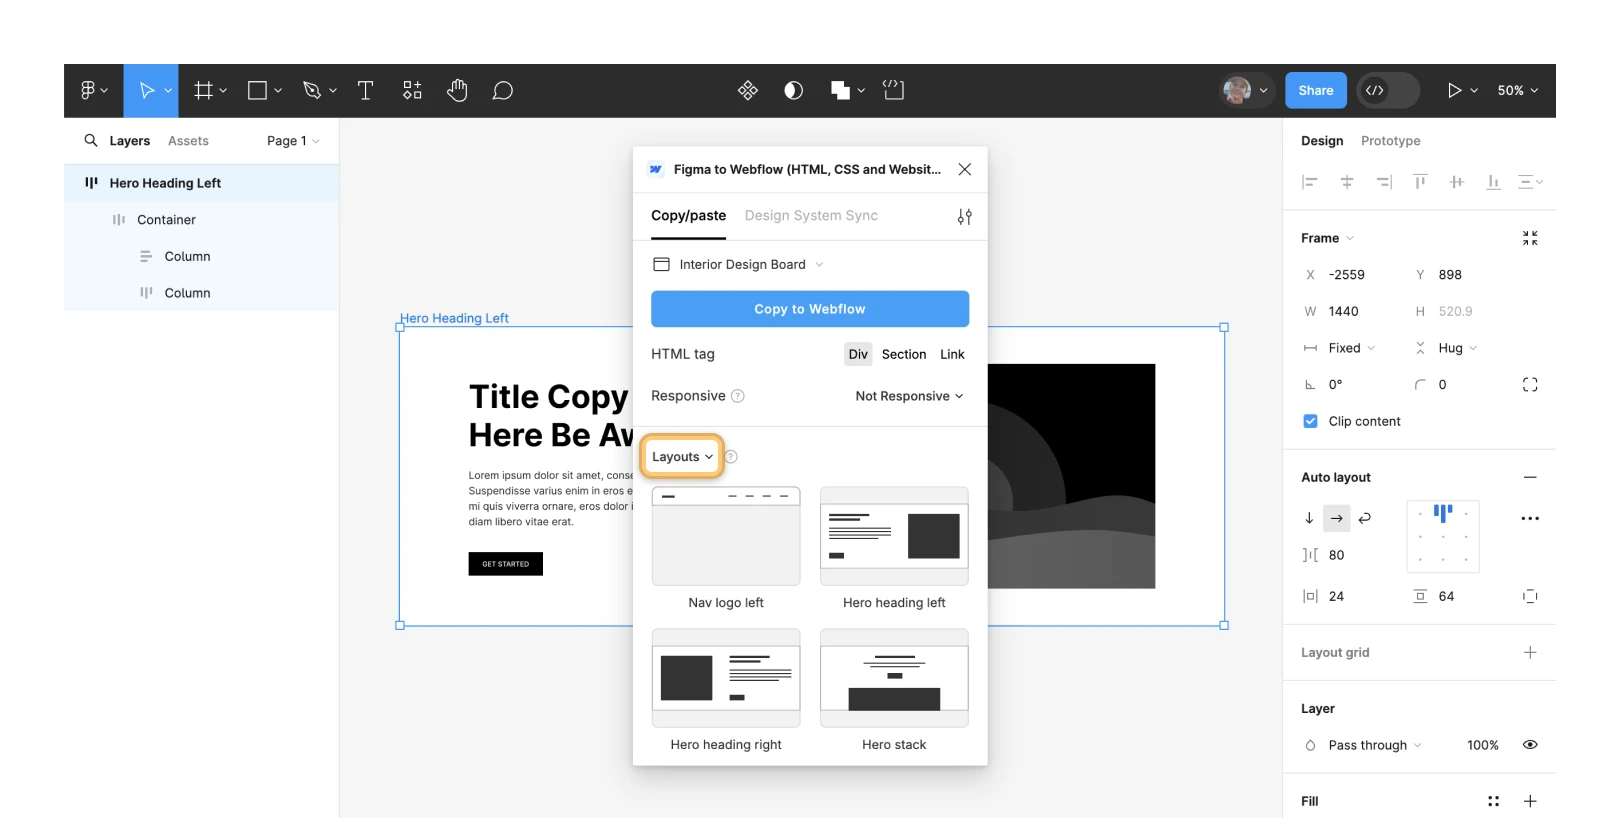
Utilize Figma to Webflow plugin layouts
The plugin offers pre-designed responsive layouts to accelerate your design process for navigations, hero sections, forms, footers, and various other common design elements.
Important: The plugin operates by translating auto layout frames into a format that Webflow’s Designer can interpret. Since Webflow is oriented towards web development, we can exclusively back frames that use auto layout.
To duplicate a layout from Figma to Webflow:
- Navigate to the Copy/paste tab in the plugin modal window and pick Layouts from the dropdown
- Choose a layout
- Select the layout on the Figma canvas
- Select the Webflow site you’d like to insert your layout into from the Choose Webflow site dropdown in the plugin modal window
- Click Copy to Webflow in the plugin modal window
- Confirm copying to Webflow if prompted by the plugin
- Launch the Webflow Designer in a separate window
- Paste the layout onto the Webflow Designer canvas
You only have to choose your Webflow site once from the Choose Webflow site dropdown. Following that, you can duplicate and paste multiple layouts from your Figma file to Webflow.
Reminder: Ensure you choose the entire layout and not just certain elements within it. Failure to select the complete layout might lead to copying issues and prevent you from pasting it into the Webflow Designer.
Employ Figma to Webflow plugin structures
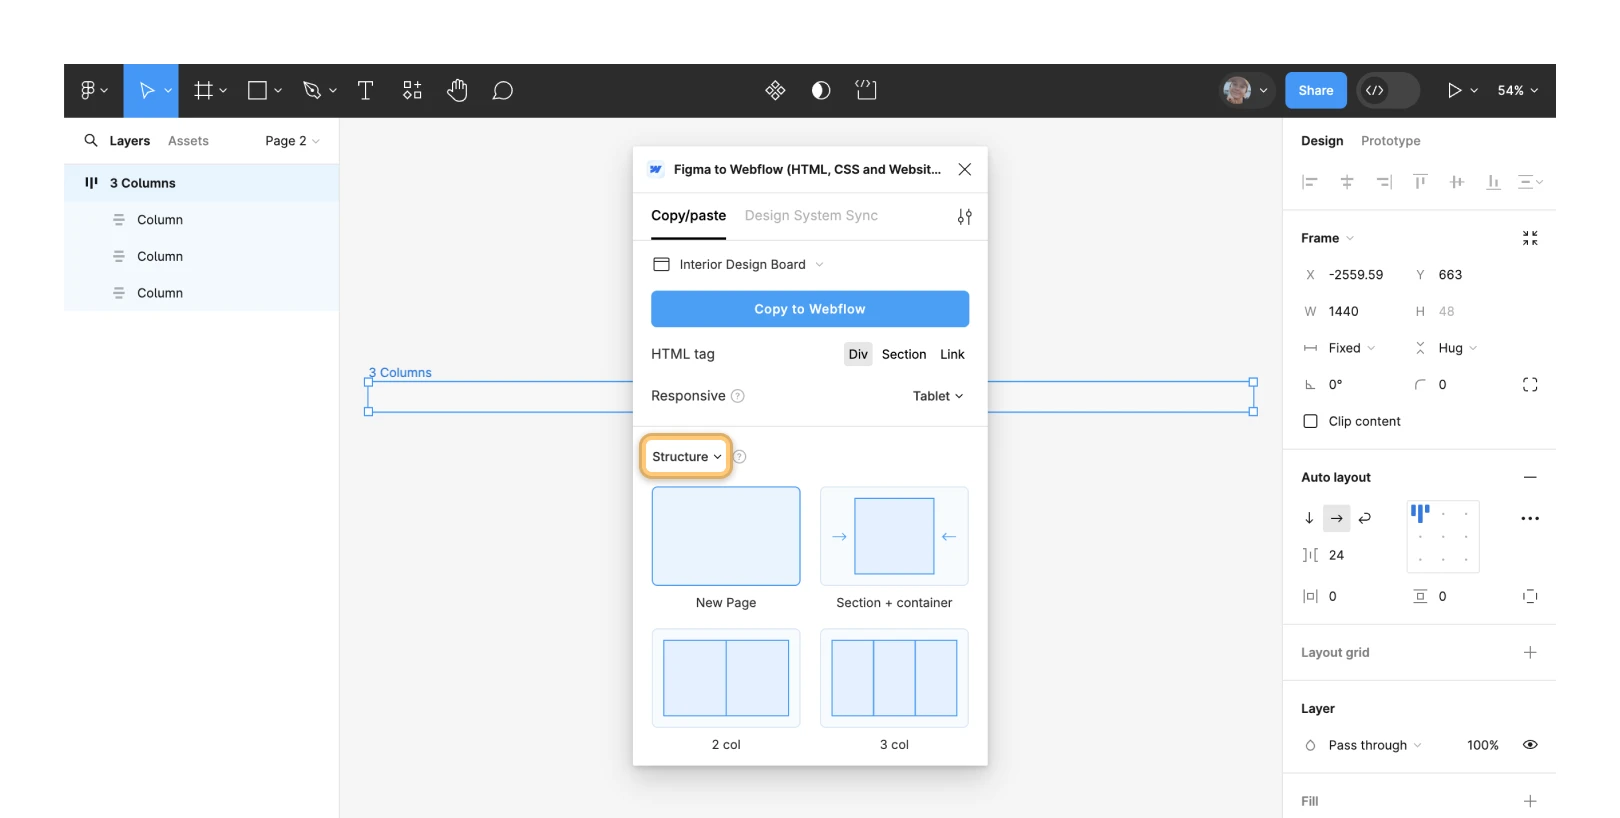
The plugin also includes pre-designed structures that offer a framework for your designs. While these structures are empty in Figma, they maintain responsiveness in Webflow — allowing you to use them as content containers. When pasting them and their content into Webflow, the structures will retain responsiveness across breakpoints.
To duplicate a structure from Figma to Webflow:
- Access the Copy/paste tab in the plugin modal window and opt for Structures from the dropdown
- Choose a structure
- Select the structure on the Figma canvas
- Select the Webflow site you’d like to insert your structure into from the Choose Webflow site dropdown in the plugin modal window
- Click Copy to Webflow in the plugin modal window
- Confirm copying to Webflow if prompted by the plugin
- Launch the Webflow Designer in a separate window
- Paste the structure onto the Webflow Designer canvas
You only need to select your Webflow site once from the Choose Webflow site dropdown. Following that, you can duplicate and paste multiple structures from your Figma file to Webflow.
Reminder: Ensure you choose the entire structure and not just certain elements within it. Failure to select the complete structure might lead to copying issues and prevent you from pasting it into the Webflow Designer.
Duplicate and paste text and color styles
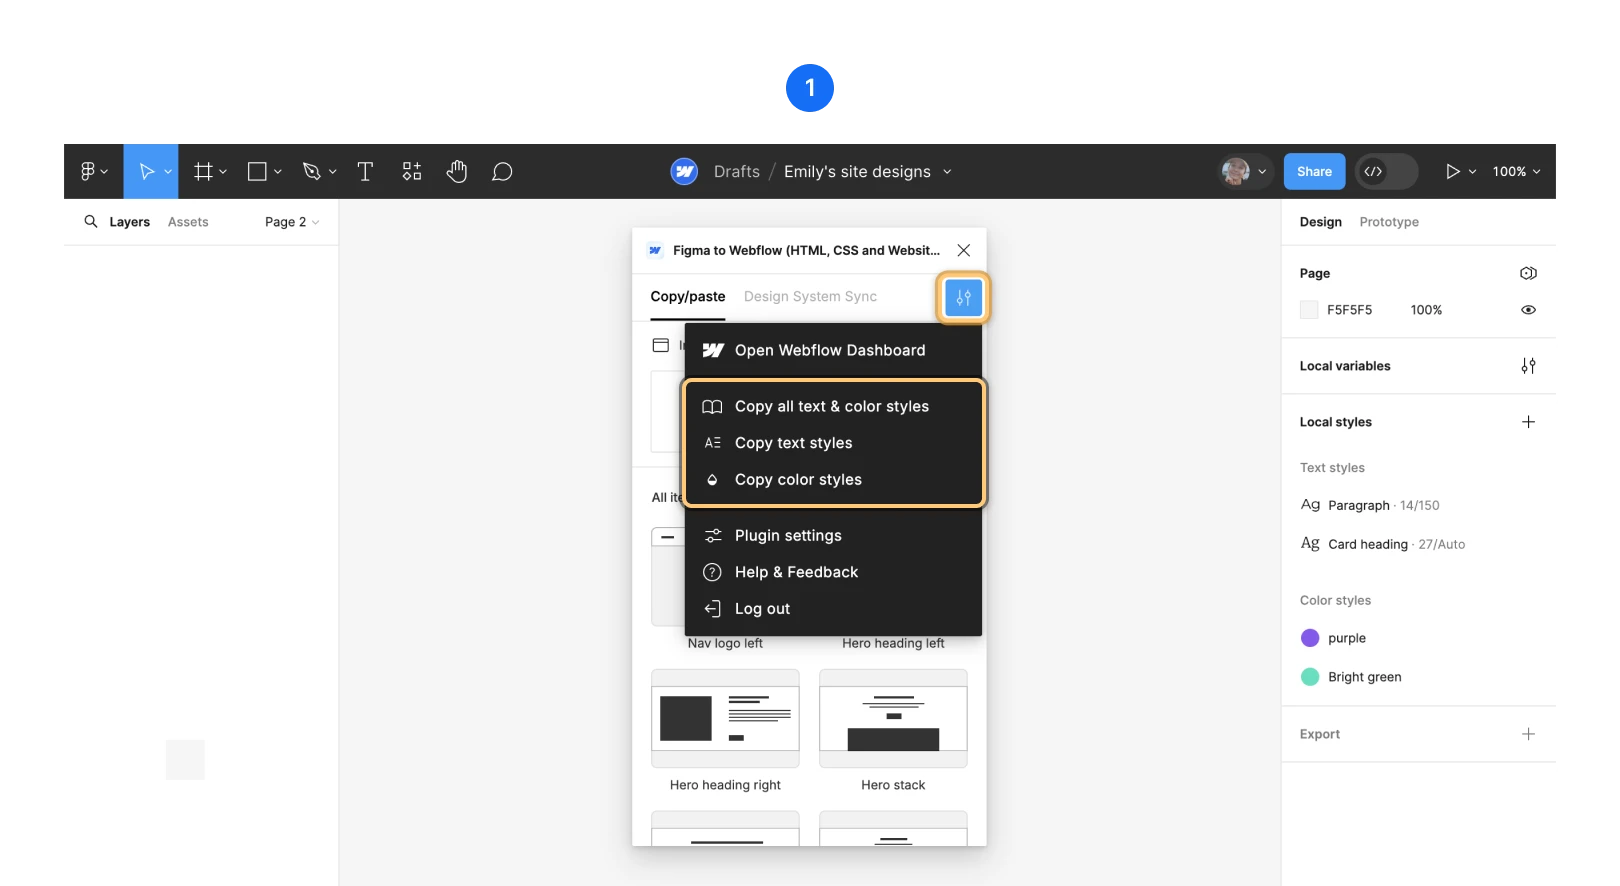
If you possess text and color styles in your Figma file, you can duplicate them to Webflow for effortless access during your site design process. It’s recommended to establish a Style guide page in Webflow for organizing your text and color styles. You can duplicate individual text styles, color styles, or all text and color styles simultaneously.
Text and color styles available for duplication include:
- Localized Figma text and color styles
- Text and color styles from Figma libraries (if applied on the current Figma page)
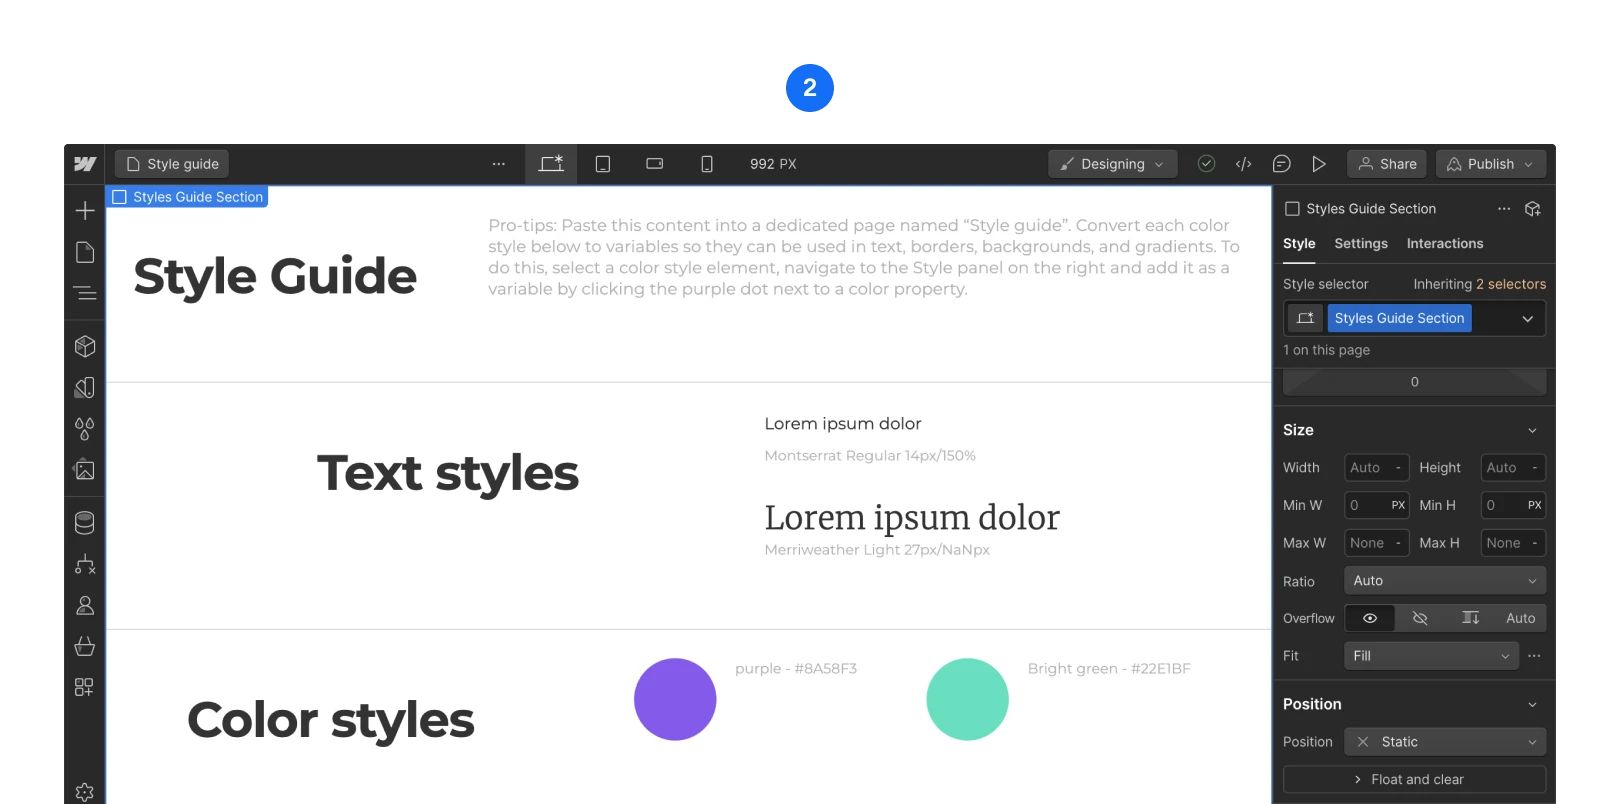
Text and color styles will be duplicated in Webflow with a predefined “Style guide” template.
Text styles
To copy text styles from Figma:
- Access the “hamburger menu” in the plugin modal window
- Choose Copy text styles
- Proceed to your designated Style manual page (if established) on your Webflow site, or another page in your Webflow site
- Hit Control + V (on Mac) or Command + V (on Windows) to insert the local text styles
The text styles will be inserted into Webflow with a pre-defined “Style guide” template. Text styles are inserted in the Text styles section. Each text style will acquire a class with the designated name from the text style in Figma (e.g., if you denominated a text style “Tahoma Bold” in Figma, its Webflow class name will be “Tahoma Bold”).
Color styles
To duplicate color styles from Figma:
- Click the “hamburger menu” in the plugin modal window
- Select Copy color styles
- Head to your designated Style guide page (if you created one) in your Webflow site, or another page in your Webflow site
- Hit Control + V (on Mac) or Command + V (on Windows) to paste in the local color styles
The color styles will be pasted into Webflow with a pre-set “Style guide” template. Color styles are pasted in the Color styles section. Every color style will be assigned a class marking it as a color swatch and the designated name from the color style in Figma (e.g., if a color style was named “Pink” in Figma, its Webflow class name will be “Color Swatch / Pink”). The hex code of the color can be viewed next to the local style on the Webflow canvas, or by navigating to the Style panel > Backgrounds, then selecting the color swatch adjacent to the color.
These color styles are not automatically generated as Webflow color variables, therefore, we suggest creating these variables manually to apply the colors throughout your site.
How to replicate all text and color styles simultaneously
To replicate all text and color styles from Figma,
- Click the “hamburger menu” in the plugin modal window
- Select Copy all text & color styles
- Head to your designated Style guide page (if you created one) in your Webflow site, or another page in your Webflow site
- Hit Control + V (on Mac) or Command + V (on Windows) to insert the local styles
The styles will be inserted into Webflow with a pre-set “Style guide” template.
Operation of the plugin
When using the Figma to Webflow plugin, several key factors need to be taken into account in the following aspects:
- Auto layout
- Special fonts
- Categories
- Combined classes
- Graphics
- HTML elements
- Backgrounds
- Adaptability
- Enhanced plugin capabilities
Furthermore, utilize the Figma to Webflow App for a smooth integration of components and variables from Figma to Webflow.
Auto layout
You can solely duplicate and paste layers utilizing auto layout. This guarantees optimal translation when copying from Figma to Webflow.
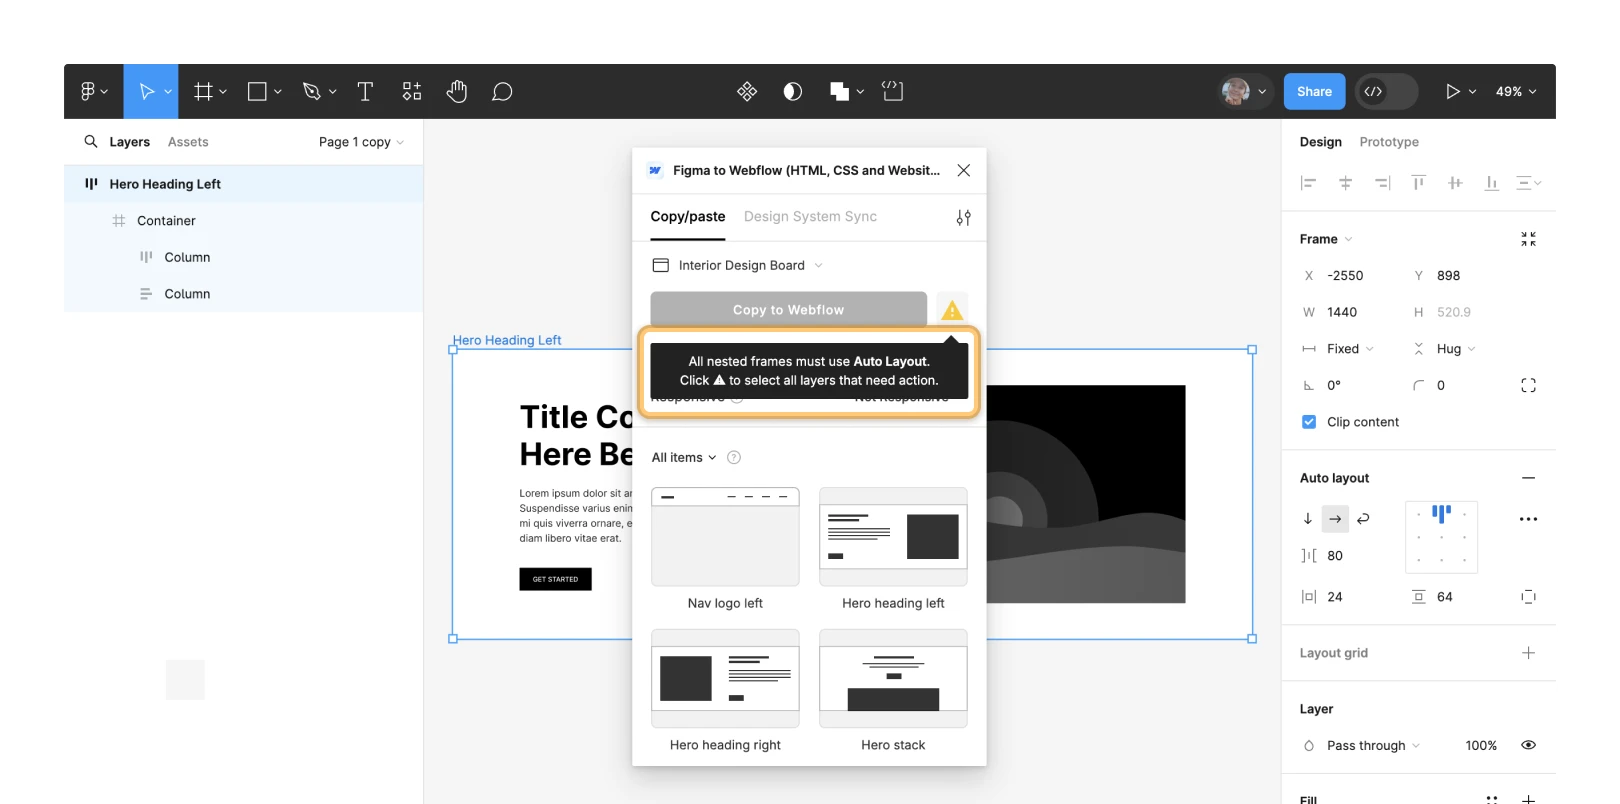
Note: In case you have a layer without auto layout in your Figma design, a notification will appear in the plugin modal prompting you to convert the layer to auto layout before pasting it to Webflow. By clicking the yellow caution triangle in the modal, you can choose all layers needing conversion to auto layout.
Special fonts
If custom fonts are employed in your Figma designs, ensure to upload them to your Webflow site before transferring your Figma designs to ensure correct font transfer. Failure to add custom fonts to Webflow may result in their loss during the transfer. Learn the process of uploading custom fonts to your Webflow sites.
Depictions and Symbols
Figma is a vector software enabling you to produce depictions, symbols, and vector logos. Most depictions are constructed from various vector layers unique to Figma and other vector tools, making them challenging for the plugin to process, often leading to timeout errors.
If there are vector layers in your design, the plugin automatically generates a new vector parent layer named “Vectors wrapper.” This wrapper encapsulates your vector layers for SVG export. After the copying process, the plugin removes this layer in Figma, although it will persist in Webflow.
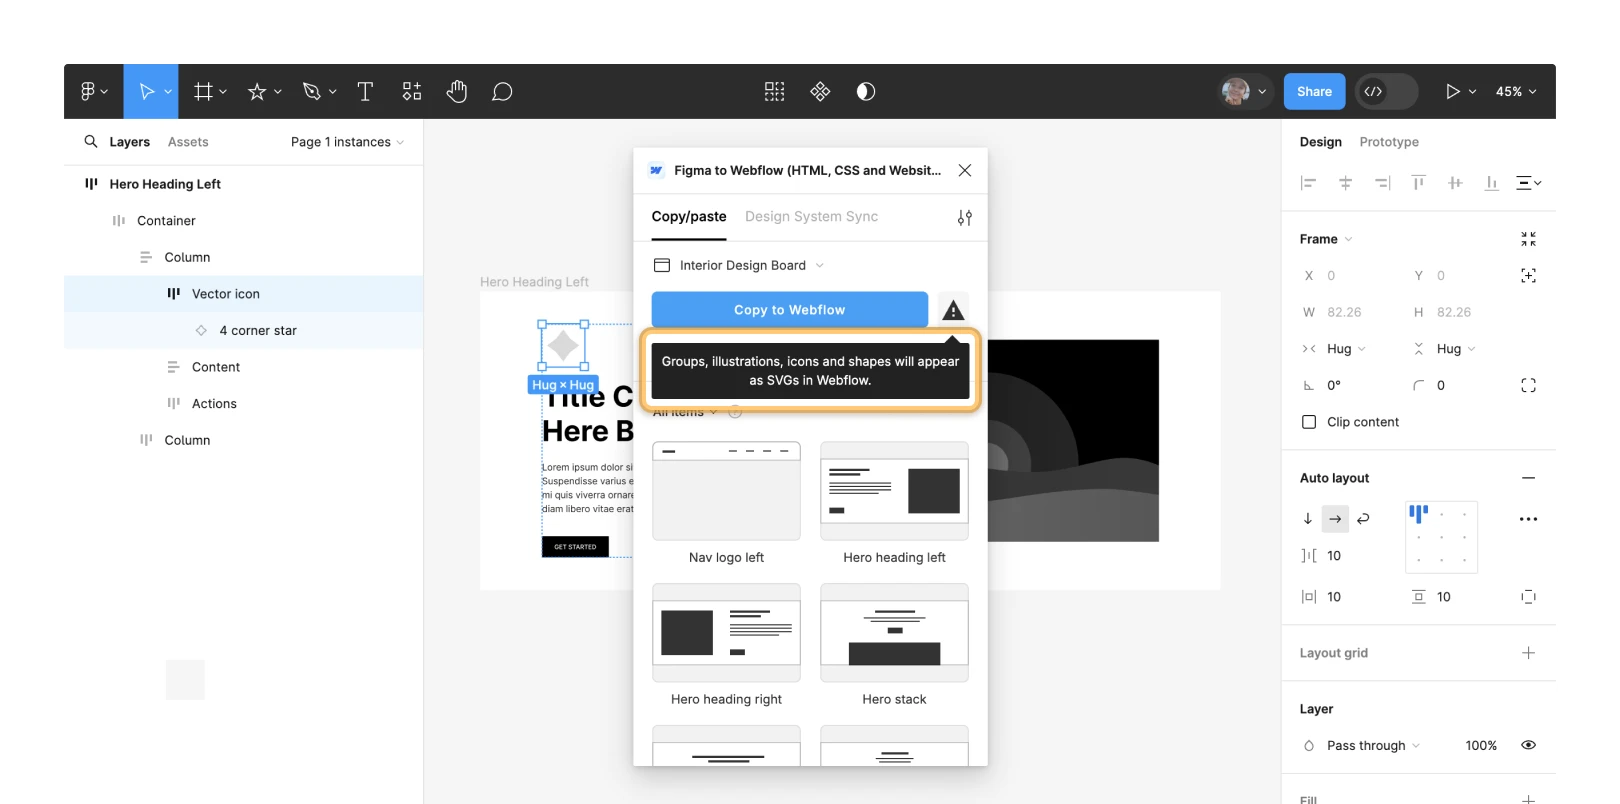
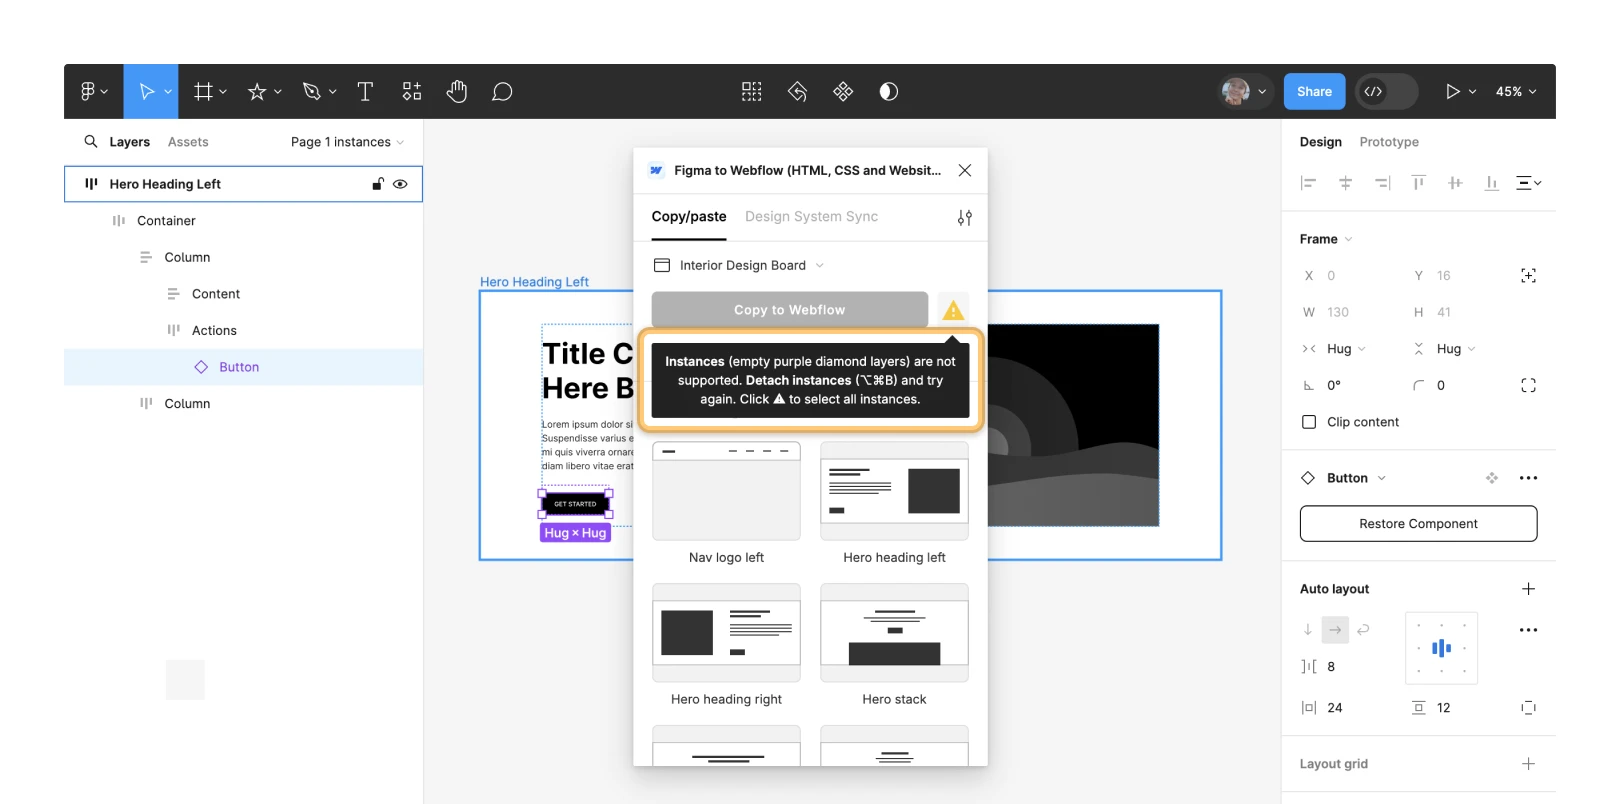
If you are utilizing Figma components within your vector layer, you may need to detach instances before duplicating the layer. If necessary, the plugin will prompt you to detach the instance.
Detaching instances can be done swiftly by pressing Option + Command + B (on Mac) or Control + B (on Windows).
Categories
Every Figma layer name is transformed into a class upon copying a design from Figma to Webflow.
Matching names, diversified styles
If two Figma layers share the samename but carry contrasting styles, the plugin will automatically rename those classes by adding a number to the class name. For instance, if two layers in Figma are named “container” with different styles, the plugin will assign a “container” class to one layer and a “container 2” class to the second layer upon pasting them onto the Webflow Designer canvas.
Similarly, when pasting a layer on the Webflow canvas with an existing class name on your site, the class name will be displayed with an incremented number. For example, if your site already contains a “Button” class and you paste a Figma layer named “Button” onto the Webflow Designer canvas, the layer’s class will be labeled “Button 2” in the Selector field. Alternatively, you can paste a Figma layer into Webflow applying existing Webflow class styles, or alter an existing Webflow class’s styles to those of a Figma layer.
Pro tip: If you frequently copy the same layout to Webflow, undesirable class abundance may occur, leading to decreased website performance. To maintain a neat class structure (and avoid clutter like “Button 234986”), eliminate unnecessary layouts or elements on your Webflow site, and tidy up styles in the Style Manager. This way, you can paste your Figma designs into Webflow without causing class overload.
Exchanging designs between Figma and Webflow
There exist 2 keyboard shortcuts for sharing styling between Figma layers and Webflow classes.
- Command + Shift + V (on Mac) or Control + Shift + V (on Windows)— this specific shortcut will enable you to paste Figma layers and apply styles by using existing Webflow classes. To proceed, simply copy the layer in Figma and then paste it into Webflow by utilizing Command + Shift + V (on Mac) or Control + Shift + V (on Windows). Your layer will then be pasted into Webflow with the styles of the existing class already in place. For instance, if you have a “Button” layer with a red background in Figma, but your “Button” class in Webflow has a green background, the “Button” layer will be pasted into Webflow with a green background.
- Command + Option + V (on Mac) or Control + Option + V (on Windows) — this particular shortcut will let you paste Figma layers and adjust existing Webflow classes to match the styles from Figma. The process involves copying the layer in Figma and pasting it into Webflow using Command + Option + V (on Mac) or Control + Option + V (on Windows). Subsequently, the existing styles of the Webflow class will be modified to align with the styles of the Figma layer. For example, if you have a “Button” layer with a red background in Figma, and the matching “Button” class in Webflow has a green background, the background color of the “Button” class in Webflow will switch to red.
Identical styles, unique class
In cases where two Figma layers or a Figma layer and a Webflow element share the same styles but have different class names, the plugin will consolidate those classes. This action helps in reducing the number of duplicate class instances in Webflow.
For instance, if you possess 2 layers in Figma that share identical CSS styles but are named differently, say one is titled “Navbar” and the other is labeled “Cool navbar,” Webflow will streamline them by assigning the same “Navbar” class to both after pasting them onto the Webflow canvas.
Combined classes
An additional capability is creating combined classes on Figma layers by adding class names following forward slashes (e.g., “base class / combo class / second combo class”).
Illustrations
Upon pasting a design containing images, those images will be uploaded to Webflow’s Assets panel. Be certain to have the appropriate site selected in the Choose Webflow site dropdown within the plugin modal window; otherwise, the images may not be uploaded to the Assets panel.
Note: You may need to refresh the Webflow Designer to view the images uploaded in the Assets panel.
Markup elements
The plugin endeavors to deduce the suitable HTML tag for each Figma layer by following specified criteria:
- Anchor tag: If the layer name contains “button,” it will transform the layer as an HTML anchor tag (e.g., “<a>”)
- Paragraph tag: If the layer name includes “description”, “text”, or “paragraph”, it will convert the layer into an HTML paragraph tag (e.g., “<p>”)
- Heading tag: When the layer name integrates “heading”, it will be transposed into an HTML H1 tag (e.g., “<h1>”)
However, if there is a desire to alter the HTML tag used by the plugin, manual configuration is feasible.
Manual determination of HTML tags
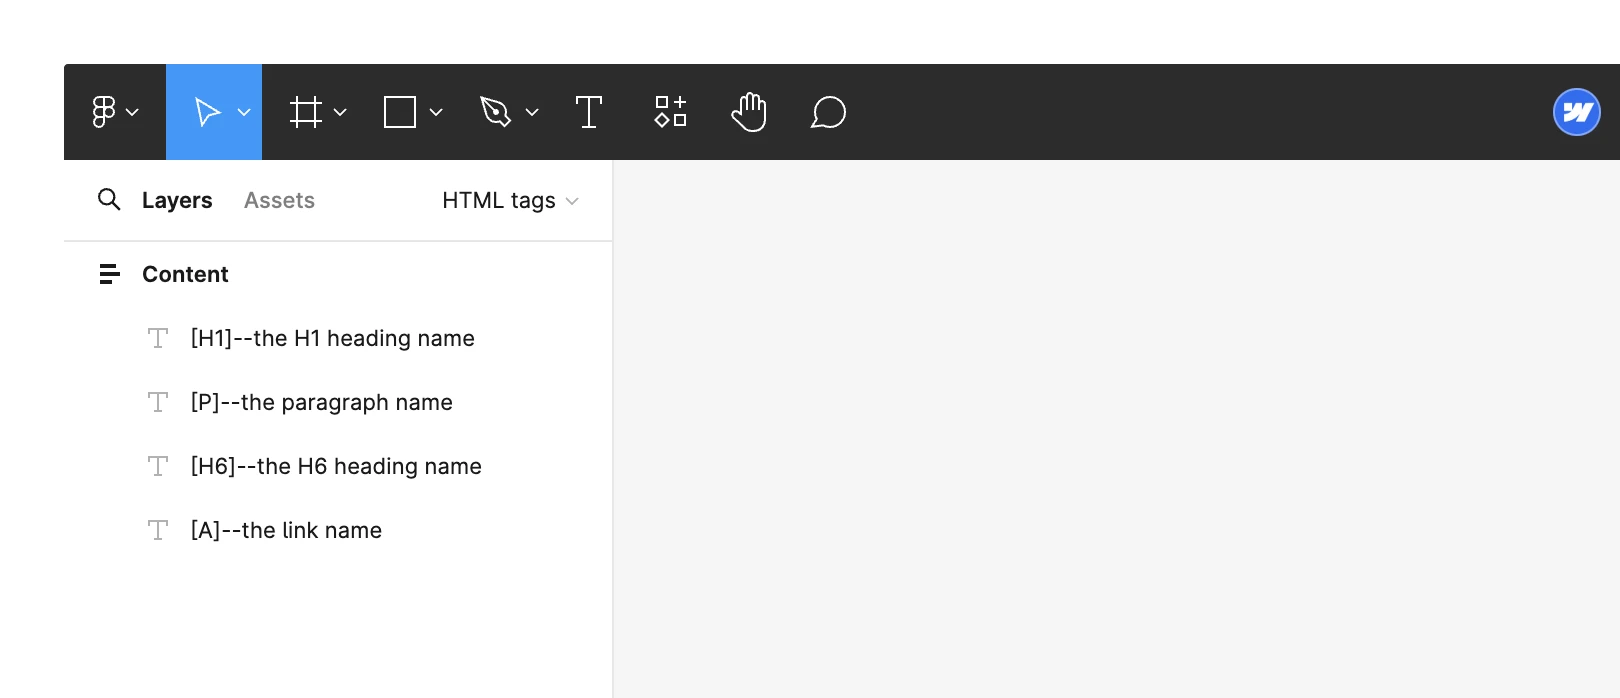
You can specify the HTML tag for each Figma layer by renaming the layer and adding the tag name enclosed in brackets, followed by 2 hyphens (e.g., “[H1]–the layer name”).
Note: Ensure that the first letter in the tag is capitalized.
The plugin accommodates these HTML tags:
- H1
- H2
- H3
- H4
- H5
- H6
- P
- A
- Div
Background options
The plugin supports solid, linear, and image backgrounds for auto layout layers and text layers.
Note: In case your background image fails to display in Webflow after using the plugin to copy and paste, kindly refresh the Designer page.
Adaptability
You also have the flexibility to determine the breakpoint at which a Figma layer transitions to a vertical stack, granting more control over the design’s responsiveness. The plugin presents 4 breakpoint alternatives for selection:
- Tablet — the layer will switch to a vertical stack at the tablet breakpoint (ranging from 991px to 767px wide)
- Mobile landscape — the layer will transform into a vertical stack at the mobile landscape breakpoint (ranging from 767px to 478px wide)
- Mobile portrait — the layer will transition to a vertical stack at the mobile portrait breakpoint (ranging from 478px to 0px wide)
- Not responsive — the layer retains a horizontal stack irrespective of the viewport width. However, you can manually establish wrap and min/max width on parent frames to ensure your design is responsive.
Note: Configuring a layer’s responsiveness in the Responsive dropdown will not be available if the layer width is below 478px or if the layer is already in a vertical stack.
To manage a layer’s responsiveness:
- Select the layer
- From the Responsive dropdown in the plugin modal, choose the breakpoint where the layer should transition to a vertical stack
Enhanced plugin functionality
The plugin dissects the chosen Figma layer and converts its styles and layout into HTML tags and CSS properties. This conversion precision is assured by accepting only auto layout elements.
Note: Regrettably, the Figma to Webflow plugin currently lacks compatibility with Figma on the Safari browser. Consequently, the plugin will not function if you are utilizing Figma with the Safari browser. We advocate using Chrome or the Figma Desktop App instead.
Uninstalling the Figma to Webflow plugin
To remove the Figma to Webflow plugin from your Workspace or from one of your sites, you should ascertain where you initially granted the plugin access. For Workspace authorization, follow these steps to eliminate the plugin. For site-specific authorization, proceed with the steps to uninstall the plugin from your site.
Eliminating the plugin from your Workspace
To eliminate the Figma to Webflow plugin from your Workspace:
- Access the Account dropdown in the navbar
- Click on Workspaces
- Select the Workspace from which you wish to remove the plugin
- Navigate to Workspace settings > Integrations tab > Authorized applications
- Opt to Revoke for the “Webflow from Figma to Site” application
Removing the plugin from your site
To eradicate the Figma to Webflow plugin from your site:
- Access your Dashboard
- Click on the “3 disclosure dots” next to the desired site
- Navigate to Settings
- Proceed to Site settings > Integrations tab > Authorized applications
- Click on View
- Select Account integrations settings
- Visit Account settings > Authorized applications
- Click on Revoke for the “Webflow from Figma to Site” application
Troubleshooting the plugin
If the plugin fails to accurately copy your designs, first ensure you are employing a supported browser. Supported browsers for the plugin include Chrome and the Figma Desktop App. Notably, the plugin is not currently compatible with Figma in the Safari browser.
If the issue persists, attempt the following measures:
- Copy a single prebuilt layout, prebuilt structure, or text layer utilizing auto layout and paste into Webflow — if the frame copies and pastes correctly, the plugin is operational. Should the frame not copy correctly, proceed with the prescribed troubleshooting steps
- Explore solutions on our Webflow Labs Community
- Engage in the Webflow Labs Community by posing queries
If after following the above troubleshooting steps the issue persists, kindly create a new Figma file containing the problematic frame and share it with the Webflow Labs team at [email protected]. They will address your concern promptly.
Offering feedback
We eagerly await your thoughts, comments, and feedback to assist us in enhancing this plugin. Kindly contribute your insights with us in the Webflow Labs Community.
- Include or eliminate Workspace spots and members - April 15, 2024
- Centering box summary - April 15, 2024
- Store a site for future reference - April 15, 2024
