Meta Pixel enables you to monitor the actions of your website visitors. Tracked conversions will be displayed in Meta Events Manager and can be utilized to evaluate the efficacy of your conversion funnel and to identify custom audiences for dynamic ad campaigns.
Prior to commencing: Examine Meta’s guidelines for configuring and deploying a Meta Pixel.
This tutorial covers the following topics:
- Implementing Meta Pixel on your website
- Implementing a delay for cookie approval
- Creating a Pixel cookie approval banner
- Activating ecommerce events
- Configuring advanced event tracking
Steps to implement Meta Pixel on your site
Vital: In case you have previously integrated a Meta Pixel on your website using custom code, ensure to eliminate the custom code before adding your Meta Pixel ID.
To insert Meta Pixel on your site:
- Access Site settings > Apps & Integrations tab > Meta Pixel
- Paste your Meta Pixel ID
Enabling ecommerce events
Once you activate Ecommerce on your website, Webflow will automatically relay the subsequent events to Meta Events Manager:
- Viewed product
- Added product to cart
- Purchased product
These events will allow you to proficiently gauge and improve your advertising campaigns on Meta and Instagram.
Learn more:
- Setting up Instagram Shopping
- Synchronizing products
- Configuring Meta Advantage+ catalog advertisements for your products
Steps to implement a delay for cookie approval
If your websites collect personal data from EU residents, it is essential to comply with GDPR regulations. You can postpone loading the pixel until your website visitors accept your cookie consent by toggling the “Delay for cookie consent” option to YES.
Once you enable this setting, you also need to request cookie consent on your site using a cookie consent banner.
How to create a Pixel cookie approval banner
Important: This guide utilizes Webflow’s embed element to include custom code. The embed element is accessible on any paid Site plan and on Core, Growth, Agency, and Freelancer Workspace plans.
You can set up a Pixel cookie approval banner with the subsequent steps:
- Devise a banner
- Establish interactions
- Embed custom code
Devise a banner
- Design and craft a banner according to your preferences, incorporating the cookie consent notification message
- Assign an ID to your banner (e.g., consentPopup)
- Integrate an “Accept Pixel cookies” button
- Assign a class to your button
- Provide an ID to your button (e.g., consentBtn)
- Add a “Decline Pixel cookies” or “Close” button
- Assign the same class to the “Decline” button as the “Accept” button
- (Optional) Include a “Learn more” link to direct visitors to your privacy policy page
- Insert the banner within a div block to function as your popup container
- Assign a class to the div block (e.g., popupWrapper)
- Configure the popup container’s position as fixed
- Select a preset position or manually adjust the position of the popup container
- Designate the popup container as a component
- Add this component to all pages of your website
Establish interactions
Begin by establishing an interaction that conceals the cookie consent banner upon visitor acceptance of Pixel cookies:
- Select the “Accept Pixel cookies” button on the screen
- Navigate to Interactions panel > Element trigger
- Click the “plus” icon to create a new element trigger
- Select Mouse click (tap)
- Access Trigger settings and select Class
- Choose On 1st click and select Select an action
- Opt for Start an animation
- Click the “plus” icon to create a customized animation
- Name your custom animation (e.g., “Close the cookie popup”)
- Choose the popup container on the screen
- Click the “plus” icon adjacent to Actions to add an action to your animation
- Set Affect to Class
- Adjust Move and set the y-axis to 100%
- Confirm the settings
Next, create a similar interaction to hide the cookie consent banner in case a visitor declines Pixel cookies:
- Choose the “Decline” button on the screen
- Click the “plus” icon to create a new element trigger
- Choose Mouse click (tap)
- Access Trigger settings and select Class
- Opt for On 1st click and choose Select an action
- Opt for Start an animation
- Choose your “Close the cookie popup” custom animation
Subsequently, set up an interaction to display the cookie consent banner when the page loads:
- Access Interactions panel > Page trigger
- Click the “plus” icon to create a new page trigger
- Select Page load
- Access When page starts loading and click Select an action
- Opt for Start an animation
- Click the “plus” icon to create a customized animation
- Name your custom animation (e.g., “Show the cookie popup”)
- Select the popup container on the screen
- Click the “plus” icon next to Actions to add an action to your animation
- Adjust Move and set the y-axis to 100%
- Check Set as initial state
- Click the “plus” icon next to Actions
- Adjust Move and set the y-axis to 0%
- Confirm the settings
Lastly, ensure the cookie consent banner is loaded on all pages of your site:
- Access another page on your site
- Go to Interactions panel > Page trigger
- Click the “plus” icon to create a new page trigger
- Select Page load
- Access When page starts loading and click Select an action
- Opt for Start an animation
- Choose your “Show the cookie popup” custom animation
- Repeat the above steps for all pages of your site
Important: Ensure to select the popup container when adding actions to your animations. Applying actions directly to the banner itself may impede the functioning of the custom code.
Embed custom code
To operationalize the cookie consent banner, navigate to Site settings > Custom code tab > Footer code and insert the provided code:
Crucial: In case distinctive IDs were utilized for your “Allow cookies” button and your popup, ensure to substitute the IDs in the aforementioned code with the IDs you employed instead. Exchange “agreementPopup” with the ID you configured for the banner. Replace “acceptButton” with the ID you set for the “Allow cookies” button.
Further references:
- Meta’s documentation on cookie agreement
- European Commission’s cookie acceptance regulations
How to establish advanced event monitoring
To get insights into cutting-edge Pixel event monitoring, refer to Meta’s manual on events. You can also examine example code for sophisticated Meta pixel utilization instances and amend the code for the events you wish to monitor.
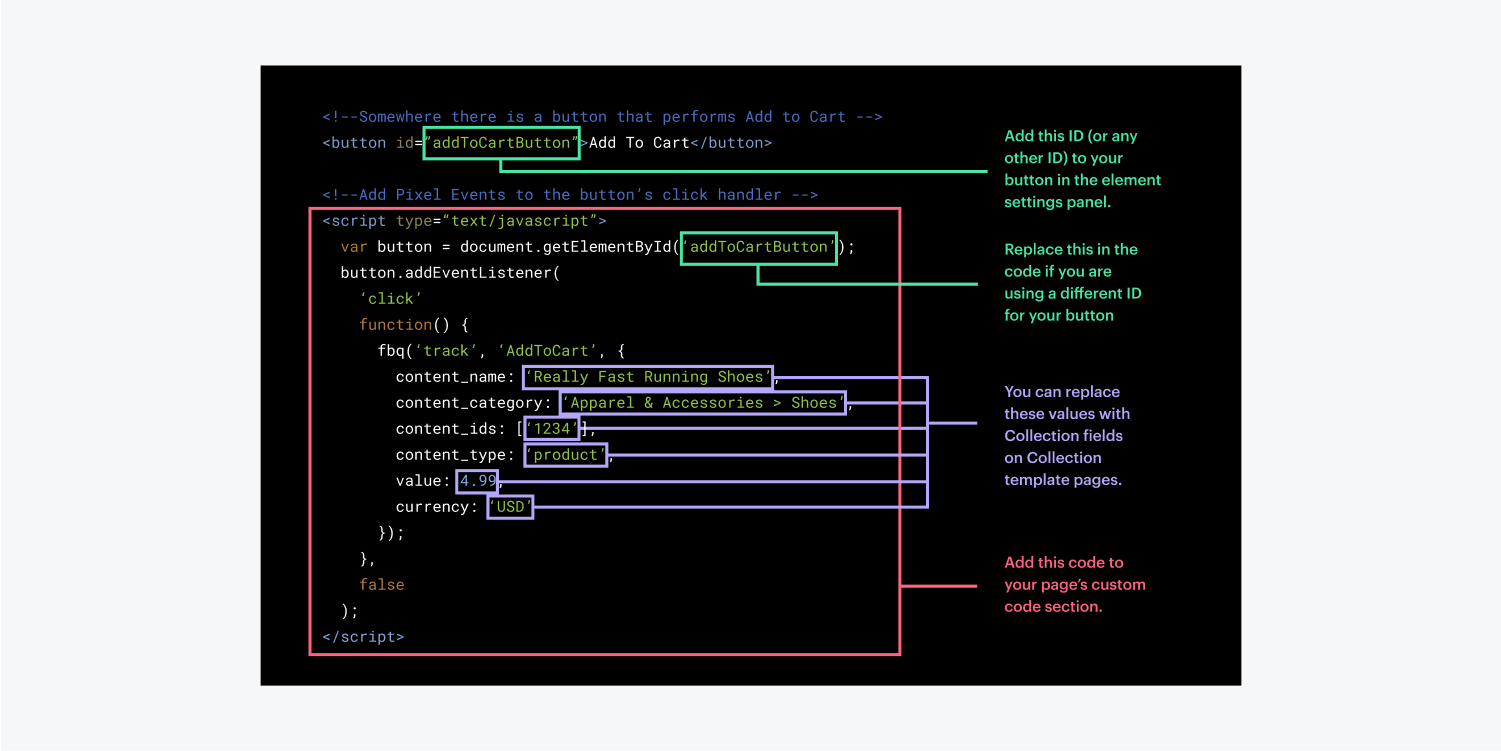
Once equipped with the suitable code for the event you intend to monitor, you can insert these events into the <head> tag of one or more pages on your site.
If intending to monitor link or button clicks, make certain to define a distinctive ID on those elements in the Designer. After that, insert your embed code into a code editor (e.g., Sublime Text or Visual Studio Code) and replace the IDs in the embed code with the IDs you assigned to your buttons or links. Finally, navigate to Pages panel > Page settings > Custom code and embed the subsequent script.

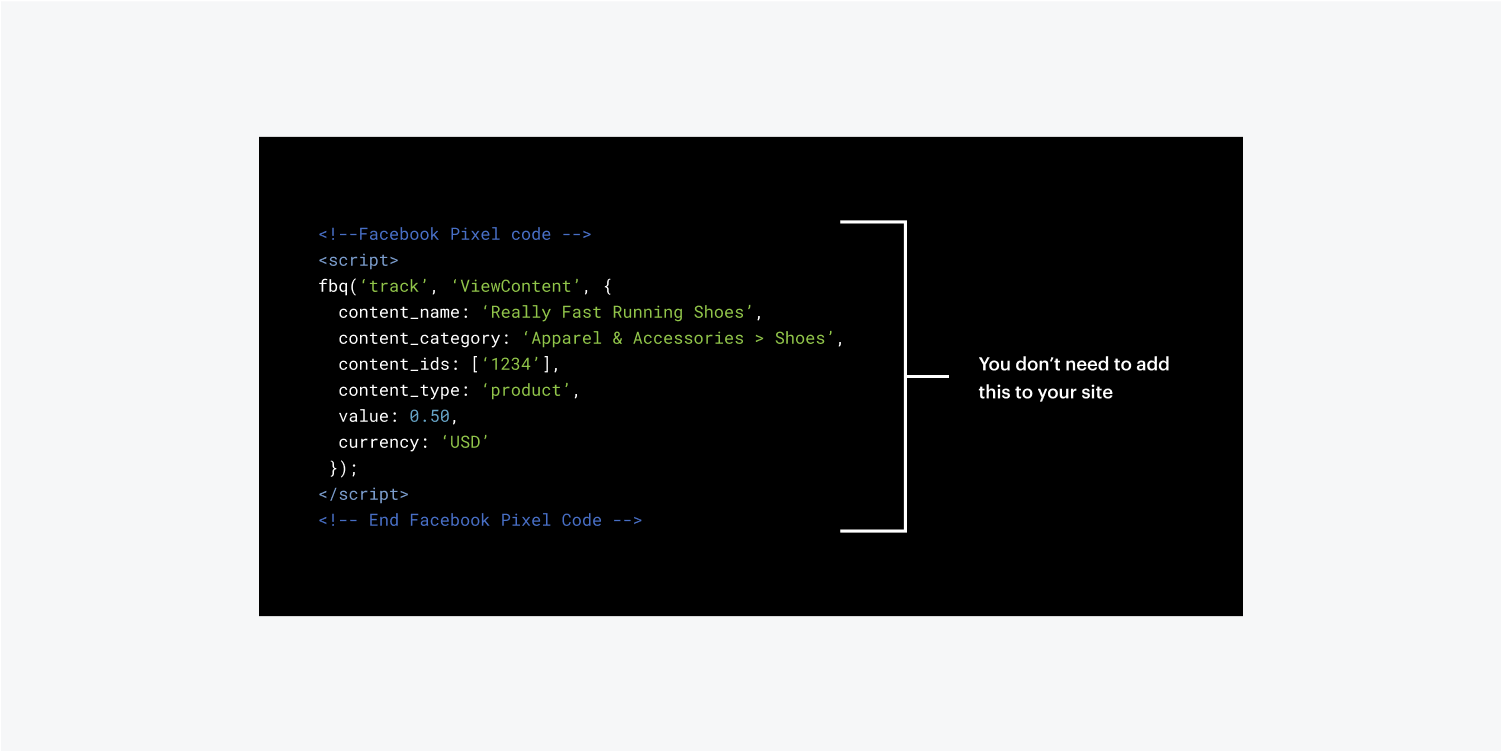
There is no need to incorporate the Meta Pixel segment of the exemplar code into your site if the Pixel ID was already included in Site settings > Apps & Integrations tab > Meta Pixel.

Note: Our assistance team cannot offer direct aid with custom code establishment or troubleshooting, as these subjects extend beyond the sphere of our client support protocol. Should you require more assistance integrating Meta Pixel events, kindly inform us on the Webflow Forum with as much detail as possible (e.g., your site’s read-only link, pertinent screenshots, the code you are attempting to integrate, and a description of the problem), where the entirety of the Webflow community (inclusive of staff) can provide further aid and resources.
- Include or eliminate Workspace spots and members - April 15, 2024
- Centering box summary - April 15, 2024
- Store a site for future reference - April 15, 2024

